Wednesday, 10 June 2020

Front garden: Spring 2020 overview, in pictures

The front garden, May 2020

The front garden has really come a long way since we first moved in. So this is an overview in pictures (I am too exhausted to write much at the moment), particularly as so many plants are now looking so good.

For comparison, this is what the front garden looked like when we moved in.
November 2017

So, going back to earlier this Spring...

March 2020
Overview near the front door

Under the Quince treen: Primula vulgaris and Anemone blanda, with grassy leaves
from Stipa tenuissima.

Looking towards the lounge room window

Quince tree

View from the front gate

One of my favourite daffodils, the fragrant Narcissus 'Cragford'

April 2020
Overview

Quince flower, Cydonia oblonga 'Vranja'

Under the quince tree, Muscari aucheri 'Blue Magic'


Planter under the lounge room window. Tulipa 'Ballerina' (orange), plus a rouge that was pulled out!

Tulipa Ballerina and Tulipa Havran (beetroot colour), plus Myosotis sylvatica and other plants

Viola 'Butterpat', which also has a lovely fragrance. Planted next to the front door.

Tulipa 'Abu Hassan'

Front: Primula veris, back: Primula elatior

May 2020
Overview

 Quince tree and Camassia leichtlinii 'Caerulea'

Camassia, in detail

Planted together: red Geum 'Mrs J. Bradshaw', and orange Geum 'Totally Tangerine'

Geum 'Mrs J. Bradshaw' up close

In another part of the garden, Geum coccineum 'Koi'

View from lounge room

Primula bulleyana and bumblebee

View from the front gate, with a young Acer Griseum

The front garden has come a long way since November 2017! Whilst I do all the designing and planting plans, the garden wouldn't be where it is without the help of my gardener Andrea. Thanks Andrea, we've created, I believe, a beautiful space.


Thursday, 28 May 2020

Keeping blackfly off Broad Beans

Broad beans in the kitchen garden. You can see the first beans are almost ready to pick.

It's the time of year to start planning those broad bean meals, as the first crops should be ready to harvest soon. However, just before the broad beans are ready for eating, also happens to be the exact same time that the dreaded Blackfly (black bean aphid - Aphis fabae) decide to make an appearance. They suck out all the goodness from the plant and can destroy much of your crop if you don't get them under control.


Images: Left - The Vegetable and Herb Expert (2002), Right - RHS website.

The blackfly head for the tips of the broad beans first, as per the picture on the left, and an example of a bad infestation is on the right. It can take only a couple of days to go from just appearing, to a bad infestation, which can destroy the flowers before they even turn into beans.


If you notice that you have ants going up and down your beans, that's because they are also getting read for them. Ants 'farm' them (photo above) and can make an infestation so much worse. These are my tips for getting ahead of the blackfly.

Pinching out the tips
The first tip, is to pinch out the tips of the broad beans. This is because this is where the blackfly will land and start their infestation. By taking out the tips, you are opening up the top of the plant to more light and air, making it a little harder for them to take over.

You want to do this once the plants look like they are a decent size and have plenty of flowers on them. This is usually around early-mid May, but can depend on when you sowed them. Earlier May if you sowed in Autumn, later May if the sowing was done in Spring.

The circle shows the tips in detail.
You can see lots of young leaves and flowers all wrapped up tight.

From another angle, me holding the tip I'll pinch out.


Closer in, you can see I'm going to take out the whole tip.

Use your fingers (or pruners if you like) and snap off the tip.

Remember, the tips are edible and you can add them to salad or a stir fry.

The flowers have been pollinated and the bean pods are developing.

Spray the blackfly
Even with pinching out the tips, the blackfly will most likely still attack the beans, you've just slowed down the process. The second line of defence is soapy water, which works by clogging up the pores which insects breathe through, effectively suffocating them. Technically, it can harm all insects, including the good ones. But it dissipates quickly and doesn't really harm anything which isn't directly sprayed.

Squeeze some washing up liquid into a sprayer (see pic below) then fill to about 3 quarters. Given it a really good shake so it gets all soapy. Then squirt the soapy water directly onto the blackfly. Be really generous and drown the buggers. Also make sure to spray the undersides of the leaves as they can hid there too.
A squirty bottle with soapy water, filled to three quarters.

Make a concerted effort of spraying them morning and evening for a few days, and most will eventually be killed off. A few may hang around, but they will be weakened, and you will have saved most of your crop.

The soapy water won't hurt good bugs like ladybirds (whose larvae eat blackfly), just the bad bugs like blackfly. In fact, you can also use this solution on greenfly.

 Dwarf broad beans, in front of tall ones

Other options
Other options include ordering some ladybird larvae to be delivered to you, as these dine on blackfly quite voraciously, and they could solve your problem. I have yet to try this, so cannot say how well it works.

Some people use Neem oil for a really bad infestation. It's apparently effective, but can be hard on the plant and it can kill 'good' insects, so best kept for when you need the nuclear option.

Both Neem oil and Aspirin contain high levels of salicylates, the plant hormones involved in boosting pathogen-defending protein production in plants. Salicylic acid is also used by some plants as a signalling mechanism when they're under attack. Predatory insects and insect eating birds will follow a trail of salicylic acid, expecting a swarm of aphids or similar. So adding 1 soluble Aspirin to your soapy water is worth trying, and one I will experiment with this year.

An 'untidy' garden, particularly for ladybirds to over winter in, to increase their habitat and numbers, can help. Whilst I do this every year, and I've created a bug hotel, I've still not had much luck with increasing the number of ladybirds in the garden, so I continue to resort to pinching out tips and soapy water.

* * * * *
If you can, try to check your beans daily for blackfly. The sooner you notice and start spraying them, the better chance you have of keeping them under control.

A few days of some dedicated checking and spraying, and you can look forward to eating these!
 Just picked (last year) broad beans


P.S. Thanks to people on Mastodon (you know who you are) for sharing their experience of using Neem oil and Aspirin. To Alx who said their beans are looking much better after just a few days of the washing up liquid spray suggestion, and Xan for the extra information about how the soapy water works on the blackfly.
 
I also recommend reading a short post by a gardening professional, Saralimback, about the negative impacts of neem oil on your ecosystem.


Wednesday, 6 May 2020

My top tip for keeping cats, foxes and birds off your newly sown beds

Frequently I see people comment on social media about the difficulty of keeping cats, foxes and other creatures, off their newly sown beds. I thought I'd share my tip, which pretty much always works.

Right: Parsnip seed


These are newly sown rows of parsnip and beetroot.


Basically, you need some netting and something to hold the netting down. Ideally, go for finer netting, as this will also keep the birds off the seedlings. And sparrows, in particular, love the fresh germinated leaves of vegetables like beetroot, spinach, chard and lettuce.

Right: netting over young beetroot seedlings. The netting is
held down tightly so birds cannot get under it and get trapped.

When I prepare the netting, I make sure I allow not just enough to cover the space, but also enough space for the young seedlings to grow without squishing up, and then growing through, the netting. Otherwise, when you come to take the netting off, you'll pull out the seedlings. I fold under the extra netting and pin that down, then unfold it once I need to give the seedlings more room. In the picture above, you can see the netting on the bottom part of the picture has been folded over then pinned down.

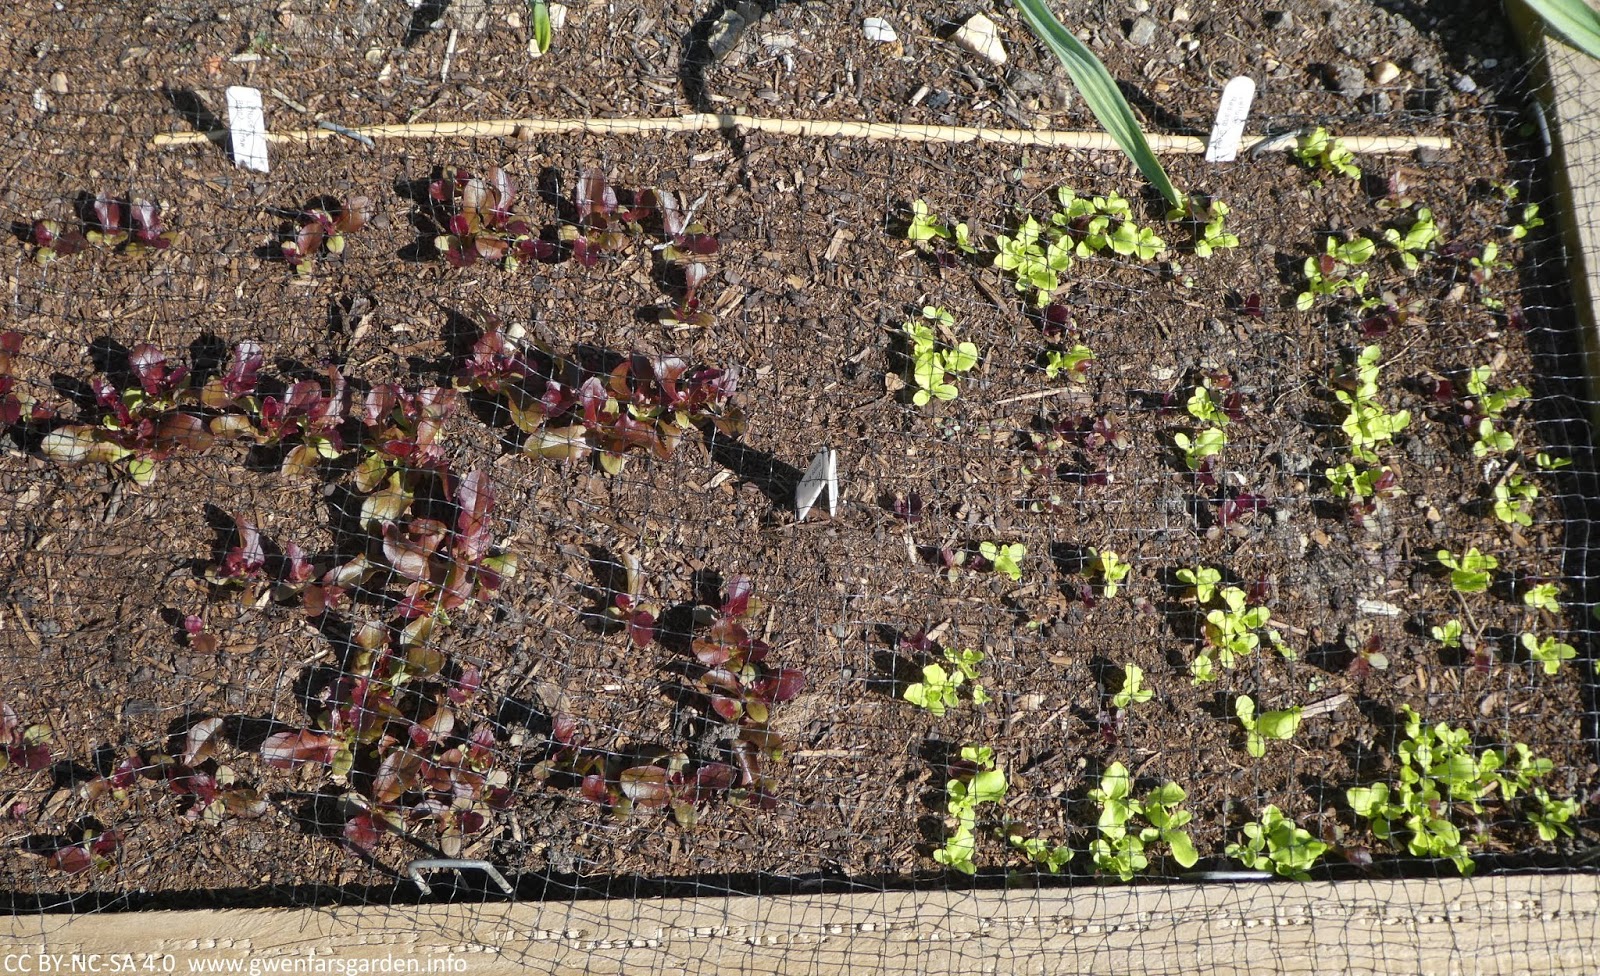
Below is some netting over some salad seedlings. The glass cloche on the left is because I wanted that cultivar to grow quicker so I would a) have some new lettuce sooner, and b) by trying to get it grow quicker, I'm hoping I'll have time to harvest but also let it go to seed so I can save the seeds before the autumn frosts hit.

The lettuce seedlings (below) are now getting bigger and were just about to start growing through the netting. So I've unfolded the extra netting and have lifted it to give them more space to grow. At this point, they are still a bit young for removing the netting entirely. I've done it too soon in the past and come out the next day to see the seedlings dug up.

The seedlings are now well established and have taken over most of the space, so it's now safe to take the netting off. You can also see how the cloche made a difference, with the lettuce on the right being bigger than that on the left.

The parsnips and beetroot are slower growers, and still too young to take the netting off. It will probably be another month before they'll be established enough.

When it comes to what materials to use, as you can see, I have used plastic netting. I've had this same netting for years and it just last and lasts. Netting is also easy to water and rain through. Because these beds are permanent, I'm cutting the netting to suit each bed, and when I take it off, I'll pin a note to the netting before putting it away, noting which bed it fits for when I need to use it next time. Yes, I'm organised  :)

To hold it down, I use steel ground pegs (see right). Again, these last forever. You could obviously use other similar tools. Some people use old soft drink bottles as individual cloches that protect and encourage germination and growth. I've tried this but found I had to lift them to water the seedlings, and that was just annoying.

I have tried tricks like using hot chilli powder spread around young plants, putting in lots of sticks to keep cats off etc. These can work a bit, but you have to reapply the chilli every couple of days and after rain, and a determined cat can work around sticks. I know, my cat is quite determined!

In the end, I've found the netting and ground pegs keep all creatures off, as well as safe from being trapped under the netting, and my seedlings are protected until they have grown up enough to go net-free.

Looking from the kitchen garden back towards the house

Wednesday, 29 April 2020

Tulip fever

It's tulip flowering time and oh gosh, do I particularly have tulip fever this year. I only have a few cultivars in my front and back gardens, but they are looking fabulous and I'm feeling that maybe I need some more?

This is T. Ballerina, my favourite tulip in a planter next to the lounge room window. It looks like it's on fire.


I love how it changes in the light. This is it waiting in the wings in the shade.

And then, voila! It dances in the sun!

Wait a minute, isn't one of those tulips looking rather different? Yes, this is a rogue tulip that's ended up with my T. Ballerina bulbs. It's possibly a cross with some of my other tulips?

Anyway, I've pulled it out and will plant it elsewhere, as this doesn't go with my 'hot' colours theme in the front garden, so it's going to be replanted in the back garden.

T. Ballerina goes rather well with T. Havran, in the ground in another part of the front garden.

T. Havran is kind of a beetroot colour, and really quite shiny.

It has a nice white part in the middle of the inside too.

Also in the front garden is T. Abu Hassan, which is a rather fabulous tulip if you ask me. I mean, wow!


I don't have as many of these as I like, and I do like. They contrast nicely with the yellow of the cowslip and the various blues.

In the back garden I don't have many tulips yet, but I did inherit these ones when we moved in.
 

Now see, they don't go with the cooler purples/pinks tones for the back garden, but well, they are so cheery. So they get to stay until I have more appropriate colours to plant in their place. Then I'll move these to the front.

The tulips in both gardens have been giving me so much pleasure. There is just one problem. Sadly, I don't have enough of them.

So, I see tulip bulbs in my future. Lots more.

Thursday, 12 March 2020

Crop rotations: the basics for urban growers

My kitchen garden and forest garden border now. The raised beds currently have garlic,
broad beans and corn salad. Now it's warming up, I can start more seed sowing
and really get the season going.
 
When I published my post on my crop rotation plans for this year in January, I got a lot of interest, particularly from people on Mastodon, who asked me a number of questions. So I thought I'd write a post covering the basics as my contribution to Solarpunk Action Week. The focus is on urban growers, as that's from where my experience comes.

Why rotate your crops?
Or, do you have to rotate your crops, even in a small garden? Yes, yes, you do.

The key principle of crop rotation is that you rotate plants of the same botanical family, which are prone to the same soil-living pests and diseases, and should not be grown in the same spot every year. The aim is to prevent the build-up of soil borne problems, such as club root, white rot, and eelworms, which often have no means of control (1).

If you continue to grow the same few crops in your garden or allotment, you risk a build up of diseases in the soil that might take years to get back under control. Particular diseases include potato cyst eelworms which affects potatoes and tomatoes, and club root which affects brassicas. Of course, in smaller gardens, disease can spread to other soil areas. Best practice is to do what you can to reduce the chance of this happening.

The other key reasons to rotation your crops is for nutrient availability/soil fertility. Vegetables have different nutrient requirements, so moving them around the growing area helps to avoid nutrient depletion in the soil (and remember, you'll be adding compost and manure/green manure each year to also improve soil fertility). Furthermore, rotating crops with alternating deep- and shallow-rooting vegetables, improves soil structure.(2)
A wooden raised bed sitting on top of acid soil.
The raised bed is filled with compost, giving it an alkaline-neutral pH. 

Does soil type (pH) matter?
The pH in soil matters because crop rotations are needed for annual vegetables, which won't grow in acid soil. A pH of 7.0 is considered neutral. An acid soil has a pH value below 7.0 and above 7.0 the soil is alkaline.

When it comes to perennial vegetables, few will have much of a problem with a slightly acid soil (pH 6-7) and some will be ok in pH 5-6. Below pH 5, you can only grow acid loving fruit and vegetables, such as most fruit, including blueberries and strawberries, or acid tolerating perennials such as sorrel.

If you have heavy acid soil (pH 5 and below), as I do, then building raised beds is the way to get around this to grow annual vegetables. My raised beds are 40cms high or more, allowing me enough depth to grow any type of annual vegetable.

Basic crop rotations
Crop rotations are usually practiced on a 3- or 4-year plan. If you have the space, plant your crops on a 4-year plan. For smaller spaces, go for a 3-year plan as a minimum.

For a simple 3-year crop rotation, divide your space into 3 sections or beds, then plant:
  1. Root crops (including potatoes, carrots, beetroot, garlic, onions and parsnips). You could include tomatoes in this group to keep the solanum family (potatoes and tomatoes), together.
  2. Brassicas (including cauliflower, broccoli, kale, radish, kohl rabi and cabbage).
  3. Legumes (peas, broad beans and beans). You could add the cucubits (pumpkin and squash) and vegetables that don't really have a group, such as corn and lettuce, here.
For a simple 4 year rotation, you would use the above, but separate out potatoes and tomatoes into their own group.

The garlic grew in this raised bed last year. This year I have created sections within this, and it
will contain a mix of broad beans, climbing French beans, squash and courgette, parsnip and beetroot.

However, even a basic crop rotation doesn't stay quite this simple, because plants have different seasons in which they grow. You plant garlic and broad beans in autumn and they'll be in their spaces from November to the following July-August. For example, one bed might have the following 4 year rotation:

Year 1: Broad beans Spring and Summer, then winter salads and green manures in Autumn and Winter.
Year 2: Peas, courgette and squash (the peas grow up, the courgette and squash underneath) for Spring, Summer and into mid-Autumn. Then plant garlic from mid-October, which will be  that will be there from October to the following July.
Year 3: Garlic up until mid-Summer, then salads and green manures for Autumn and Winter.
Year 4: Potatoes from Spring until Autumn.

After year 4, you return to year 1 and start again.

This photo shows an overview of a previous garden in mid-summer, 2015, which ran on a 4-year schedule. You can see how much you can fit into a small urban garden. The raised beds have been divided into roughly a metre squared sections, with different annual vegetables growing in each. The same view looked different next year as the crops are rotated.

Below are the plans I have, using a 3-year crop rotation cycle. Visit my post on crop rotations for my garden to see more detail.

Detailed crop rotations
Here's an example of crop rotations for a larger amount of beds, from a previous garden. This also includes a larger amount of crops, including brassicas and solanums. The beds were a mix of 3 smaller beds (1-3), and two long beds (4-8 and 9-13). The long beds were broken up into sections in order to make it easier to plan for crop rotations. This meant I could go with a 4 year rotation plan.

This is another photo from 2015, more clearly showing the different vegetables growing in different sections. In this space is: garlic, potatoes, climbing French beans, broad beans, parsnips, and carrots under white netting.

Final thoughts
You don't even need to start of with making big crop rotation plans as I do (I'm a bit of a nerd in that area). As long as you keep a record of what you plant, and where, each year, you'll be fine. Crop rotations can be flexible, just keep botanical families together. You can mix botanical families, but move them around the beds/rotations, together.

* * * * *
My thanks to Alison from Backyard Larder for information regarding growing perennials in acid soil.

References
1. Growing fruit and vegetables on a bed system the organic way, Pauline Pears, 2004, p25.
2.  Encyclopedia of Organic Gardening, editor Pauline Pears, 2001, p301.