Showing posts with label Vegetable beds. Show all posts

Wednesday, 6 May 2020

My top tip for keeping cats, foxes and birds off your newly sown beds

Frequently I see people comment on social media about the difficulty of keeping cats, foxes and other creatures, off their newly sown beds. I thought I'd share my tip, which pretty much always works.

Right: Parsnip seed


These are newly sown rows of parsnip and beetroot.


Basically, you need some netting and something to hold the netting down. Ideally, go for finer netting, as this will also keep the birds off the seedlings. And sparrows, in particular, love the fresh germinated leaves of vegetables like beetroot, spinach, chard and lettuce.

Right: netting over young beetroot seedlings. The netting is
held down tightly so birds cannot get under it and get trapped.

When I prepare the netting, I make sure I allow not just enough to cover the space, but also enough space for the young seedlings to grow without squishing up, and then growing through, the netting. Otherwise, when you come to take the netting off, you'll pull out the seedlings. I fold under the extra netting and pin that down, then unfold it once I need to give the seedlings more room. In the picture above, you can see the netting on the bottom part of the picture has been folded over then pinned down.

Below is some netting over some salad seedlings. The glass cloche on the left is because I wanted that cultivar to grow quicker so I would a) have some new lettuce sooner, and b) by trying to get it grow quicker, I'm hoping I'll have time to harvest but also let it go to seed so I can save the seeds before the autumn frosts hit.

The lettuce seedlings (below) are now getting bigger and were just about to start growing through the netting. So I've unfolded the extra netting and have lifted it to give them more space to grow. At this point, they are still a bit young for removing the netting entirely. I've done it too soon in the past and come out the next day to see the seedlings dug up.

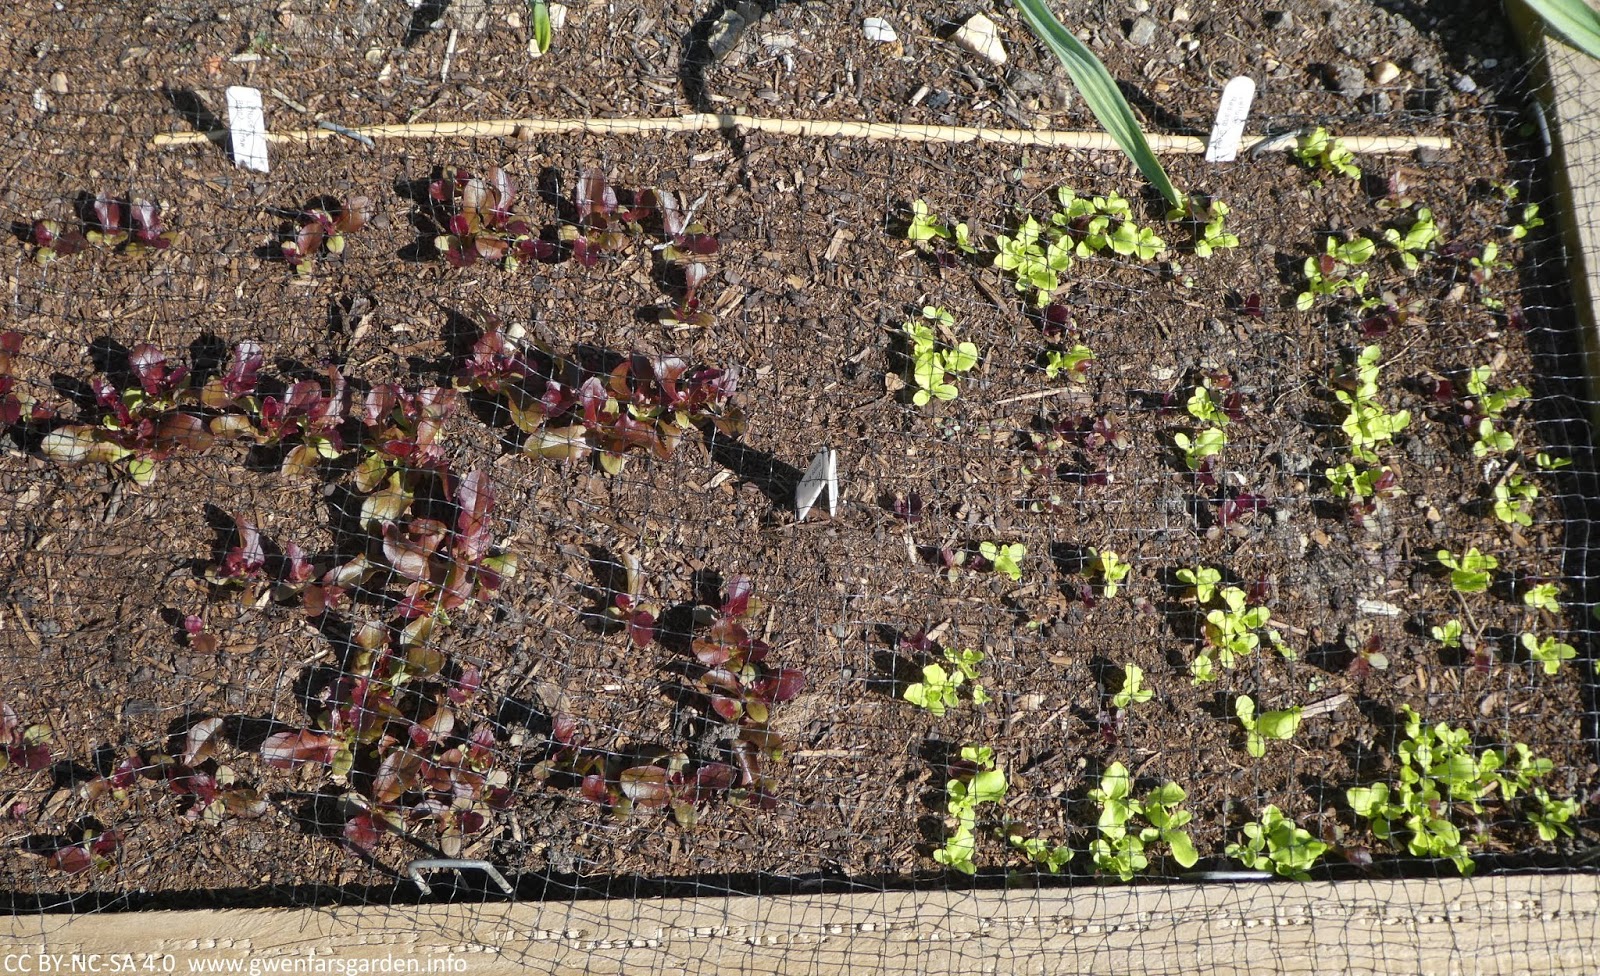
The seedlings are now well established and have taken over most of the space, so it's now safe to take the netting off. You can also see how the cloche made a difference, with the lettuce on the right being bigger than that on the left.

The parsnips and beetroot are slower growers, and still too young to take the netting off. It will probably be another month before they'll be established enough.

When it comes to what materials to use, as you can see, I have used plastic netting. I've had this same netting for years and it just last and lasts. Netting is also easy to water and rain through. Because these beds are permanent, I'm cutting the netting to suit each bed, and when I take it off, I'll pin a note to the netting before putting it away, noting which bed it fits for when I need to use it next time. Yes, I'm organised  :)

To hold it down, I use steel ground pegs (see right). Again, these last forever. You could obviously use other similar tools. Some people use old soft drink bottles as individual cloches that protect and encourage germination and growth. I've tried this but found I had to lift them to water the seedlings, and that was just annoying.

I have tried tricks like using hot chilli powder spread around young plants, putting in lots of sticks to keep cats off etc. These can work a bit, but you have to reapply the chilli every couple of days and after rain, and a determined cat can work around sticks. I know, my cat is quite determined!

In the end, I've found the netting and ground pegs keep all creatures off, as well as safe from being trapped under the netting, and my seedlings are protected until they have grown up enough to go net-free.

Looking from the kitchen garden back towards the house

Saturday, 18 January 2020

Gardening with ME: plans for the kitchen garden this coming season


I've been mulling over what to grow in my veg beds this coming season. I decided to focus on the following categories:

A) veg I love but cannot easily get hold of from our local supermarket,
B) veg I love but makes good sense to grow yourself, and
C) some veg I love and just want to grow my own.

This might seem like I'm not leaving much out, but I'm pretty much excluding most of the large Brassica family, as I find them just too much work. In particular, dealing with the depredations of the cabbage white moth, even when using protection such as agricultural mesh. I'm not bothering with Carrots as carrot fly can be quite a pest, again, even when using protection. Anything (except pumpkin/squash, see C below) that requires lots of heat, which you can never guarantee in and English summer, is being left out. So no aubergines, cucumbers or sweetcorn.

In category A fit veggies such as Kohl Rabi, Fennel bulbs, Peas, Tatsoi and Broad Beans. Whilst peas are common, fresh peas are not, and the same with Broad Beans. I adore Broad Beans, and sowed some this Autumn past, and because of the mild winter, they have already taken off.

Some Broad Beans picked last year

Kohl Rabi, is part of the Brassica family, but from previous experience I've learned that it didn't seem to be bothered by pests, in particularly, the cabbage white moth. I'm growing it because it tastes good (roasted in particular), and I mean, how can you not grow it. It's purple. It looks like an alien. It's purple!

Mmmmm, purple Kohl Rabi

Roasted Fennel bulbs are divine. They have a licorice flavour, and even my partner, who doesn't like licorice at all, adores roasted fennel bulbs. I'm going to try Tatsoi because I do love making stir fry and the only place I can buy it requires a car journey.

The main veg in category B is lettuce. Not only do I find a lot of lettuce from the supermarkets bland, more importantly, it's easy to grow, and mine won't be covered in plastic. Lettuce is also one of those veg where one packet of seeds can supply us in salads for months. I'll be growing a mix of salads, including 'Bronze Arrow', a excellent cultivar from the Heritage Seed Library. I'm going to try and grow enough to save some seeds from these.

I also find Climbing and Dwarf French beans easy to grow and fresh beans are so good. The bonus is, if I end up not picking them, I can let them go to seed and then use those in stews in winter.

A pumpkin grown a few years ago

Finally, the those I just love, category C, which include my beloved garlic, but also courgettes and pumpkin/winter squash. Yes, pumpkins need a good period of heat and decent autumn. So this year, I stopped myself from ordering some Queensland Blue seeds (a massive pumpkin), and instead I'm just going to try a couple of the smaller cultivars such as Blue Kuri.
 
Of course, there is a proviso on any plans, my health. You cannot plan for the daily, sometimes even hourly, fluctuations and impact of ME. But I can plan for best case scenario, with the understanding that all might fall apart if the ME symptoms get worse. And to be kind to myself about this, if this is the case.

I've purchased the seeds I didn't have, some from Real Seeds and Seed Co-op, plus this years Heritage Seed Library seed choices have arrived. Now it's just waiting for it to warm up enough to be worth making the first sowings.


Wednesday, 17 July 2019

New veg beds - aka finally making a decision on the final layout of my kitchen garden

The kitchen garden?

Not an inspiring photograph, is it? I mean, yes, you can see my slowly developing Forest Garden Border around the edges (the blueberries are nearly ready!), and some raised beds with garlic. But the lawn dominates. However, not for much longer.

I've always intended that this area of the garden would become my kitchen garden, as it gets the most sun all year around. I just hadn't been able to make a decision about the design layout. I've played around with a number of layouts over the last few months, and I've finally came to one that I both liked, and that I felt maximised the use of the space. And here's the plan:

Base map: showing the shape of the design clearly

I view it as a geometrically-shaped flower.

The design has been very carefully measured a few times, and I'm certain that it will work. And I must thank Andrea, my gardener, who helped me with the final measuring out and design tweeks.

 Final design with all the careful measurements

Once again, I'm going with straight lines. That's because straight lines are so much cheaper to build. I plan on adding some plants, such as creeping Thyme, along the paths, as well as some other low growing herbs and ornamental plants, which over time will help break up the lines.

The beds will be made sleepers again and will also be two levels high. As I've mentioned before, I have acid soil, so I need to build the soil level up with alkaline/neutral compost if I want to grow vegetables. For the paths, we will be putting down a permeable membrane, and will then add purple shale on top. I've used this method in the past and I know it works well and looks good. 

The obelisk sitting in the middle of another raised bed during last winter.

I'll be moving my Obelisk from it's temporary position (above) to the centre kitchen garden bed, which will add some height and year round interest. And of course, it will be good for growing climbing french beans and peas, with cut flowers, including sweet peas, on alternate years.

The landscapers will be here next week! And I've just ordered the nearly 5 tonnes of compost to fill the beds. So it's all go for my new kitchen garden borders.

Thursday, 7 April 2016

Spoonie Veg: growing in raised beds and containers

After publishing my introduction to Spoonie Veg post, I received some really interesting and helpful perspectives from readers, both on my blog and in Twitter conversations. One thing that came out of this was that I realised a post on where to grow your fruit and veg might be useful, before starting on individual plant posts. As Michelle said 'spoon ratings may apply to techniques as well as particular veg'. Therefore, based on my experience and some tips from readers, this is an overview on growing in raised beds and containers.

My raised beds in the kitchen garden area, looking barer but neat at this time of year

Raised Beds (Spoonie Veg rating of 1-2, but could go up to 4-5)
In all honesty, I really think the easiest way to grow if you have room, (whether you have a chronic illness or not), is by using raised beds. Yes there is the initial work in getting them set up which is Spoon-heavy, I confess. But, with help, once done they are much easier to manage.

I use Link-a-bords, which are made from 98% recycled uPVC. Whilst they aren't as attractive as sleepers or wooden borders (see picture above, from my garden this week), they are easy to put together and basically need no maintenance, the latter a big plus in my view. They are also an easy way to implement a no-dig* regime and I have found they really do keep weeds to a minimum.


The 'con' is that you do needs funds for the initial outlay, so if that's an issue, going through local skips for wood that is being thrown away is a cheaper option. But then you need the Spoons to scavenge, you may need access to a car to cart your wood home, etc. Like everything with a chronic illness and a tight budget, you have to weigh up your options and spoons.

As an example, I use Link-a-bords to 45cms high (3 levels). The advantage of building them up to this height is:
a) getting more light (and warmth) onto the beds for a longer period of time;
b) because my soil is acidic, I need a decent depth to add in compost for growing vegetables, which need alkaline soil;
c) it's means less leaning and therefore is better for my back. Less leaning is also less spoons.

My raised beds last July, looking better with lots of plants and food growing

Michelle also finds raised beds are much easier to cultivate on her clay soil and I think that's a good general point about clay soil. Why spend so much time and spoons digging and then trying to improve the heavy clay soil, when you can build raised beds on top of it and add in all the good compost and manure that way.

Helen Gazeley also suggested that putting in an irrigation system can also reduces spoons. This is something I hadn't thought of when I designed my garden, and I wish I had. This would remove a lot of time and spoons you need to spend on watering, as it's just a case of turning on and off a tap. Something to seriously consider if you are planning a new garden. When I have the funds, I'd like to retroactively add a irrigation system to my raised beds.

Raised beds get a rating of 1-2 spoons if they are permanent beds that need no maintenance other than you added more compost/manure once a year.

A 4-5 rating is for those raised beds that may be permanent, but need ongoing maintenance every few years. This would be if you have build the beds with thinner wood that need either wood/varnish paint/protector or even replacing every few years. The 4-5 rating would only apply once in a few years.

Of course, if you are unable to set up raised beds, or don't have that much space, then container growing is the answer.

Pumpkin growing in my front garden out of a large planter, strawberries mixed with perennials
in a medium-sized wood container, dwarf french beans growing in plastic containers.

Containers (Spoonie Veg rating of 1-2, but could be 3 in hot or drier weather)
Containers are a good option if you have limited space as well as limited energy. They can be large planters, as above, which stay in that place, or smaller containers like the plastic ones which fit into smaller spaces and can be moved more easily.

Because I don't have a large garden and have limited options for catching the sun, using containers gives me more growing space than I have with the raised beds alone. For example, the driveway is concrete and gets quite a bit of sun between April and September, so it's ideal for placing containers there, maximising the sun's warmth in this limited space during this period. The car gets parked further down into the shady area.

There were some great suggestions from readers about growing specific veg in containers. Helen finds it much easier to grow potatoes in containers. And I was challenged by Helene for my high spoon score for tomatoes. She grows tumbler cherry tomatoes in a window box, requiring no pruning, pinching or staking, just watering and feeding.

Container growing is also beneficial when it comes to fighting some pests. Matt has found growing baby carrots in containers has been a great way to avoid Carrot Fly. On the other hand, Janet doesn't bother growing carrots in neither raised beds or containers, and instead focuses her limited spoons on veg that increases considerably from one seed. One carrot seed, one carrot. One bean seed, lots and lots of beans. This is a useful way of maximising yields from energy spent.

Containers get a Spoonie Veg rating of 1-2 as it's mainly filling with compost and sowing, watering and occasional feeding, then emptying compost when the annual fruit or veg has finished growing. To save on compost, you could reuse it next year, mixed with some new compost/manure, for a different crop, or put it on your flower beds as a mulch.

I'm experimenting growing garlic in pots. One pot has 1 clove, the second has 2, the third, yep, has 3. I hope to work out the optimum number that develops good sized bulbs in a 10 litre container.

However, containers get a rating of 3 when you have a lot of containers and combined with a dry summer and need to do a lot more watering. In this case, fruit and veg grown in raised beds usually needs less watering as they can send their roots out deeper into the soil to access water and nutrients. Container grown plants cannot do this and you need to water them more often, which increases their Spoonie rating in this instance.

I've tried to capture most of the key issues from a Spoonie Veg perspective for growing in raised beds or containers. Please leave suggestions below if you have other points that you feel should be included.

*If you are new to no-dig, visit Charles Dowding's site where he gives information about the many benefits of no-dig. From a Spoonie Veg perspective, no-dig immediately removes a lot of work from growing.

* * * * *
I welcome your thoughts and comments. And if you blog about gardening with ME/a chronic illness, do link to this post in your blog and leave a comment below with a link to your post, so we can all find each other.

About Spoonie Veg and Gardening with ME

Twitter hashtags: #SpoonieVeg, #GardeningWithME

Recent Gardening with ME posts...
  Gardening with ME: a gentle start to the year with Cornus pruning
  Gardening with ME: a review of 2015

Sunday, 13 April 2014

My entries for "Great British Spud Off 2014"

I love potatoes. Just love them. Growing them, cooking them, eating them. I need a regular potato fix. I don't know if it's some distant Irish genetics in my blood or just that crispy baked potatoes are one of the finest foods on this earth. My Sheffield garden is considerably smaller than my Oxford allotment, so I'm limited in the number of potatoes I can grow. So whilst I'm unable to grow 10 varieties a year and enough spuds to last my partner and I c. 6 months, I can still grow some and get my potato fix.

This year I will be growing Pink Fir Apple and Stemster, in my kitchen garden raised beds, each 1m x .75cms. That was going to be it, until I heard about the Great British Spud Off 2014. In this contest, the idea is to grow one potato in one container. When you harvest your potatoes, you send in the information on how many potatoes you produced and their overall weight. Participants use "whatever soil or compost you wish to grow it in as we hunt for Britain’s spud growing champ". How exciting!

So, as a way of harvesting even more potatoes from my small garden, and the chance of becoming a potato growing champion, here is my entry...

First up: Pink Fir Apple


Pink Fir Apple is meant to be one of those potatoes that does well in containers, so I've got hopes that I should get a good crop. I suggest we not comment on the very phallic look of Pink Fir...

The rules don't say anything about how many entries you can have, so if I'm allowed a second, then here it is...

Second entry: Stemster


This is a good all-rounder potato, and when I've grown it in raised beds in the past I've had a great crop with some very large potatoes. I'm not expecting that much from growing this variety in a container, as I don't think it's really meant to be container grown. However, I had a spare seed potato and decided to throw this into the ring and see how it does.

I have of course covered both with some compost, watered them, and now await my (winning) crop!

Anyone can join the competition, even if you aren't living in the UK! To enter the competition, visit the Two Thirsty Gardeners website for details.

* * * * *

Date planted: 11th April 2014
Soil: compost from Heeley City Farm (green waste compost)
Container: 40cms at base

Thursday, 27 February 2014

End of month view: February 2014

It's amazing what a difference 28 days makes in the garden. Since the end of January the amount of light coming into the garden has doubled, and the middle veg bed is now getting full light during part of the day.

More sun in the kitchen garden

The height of the sun in the sky increases daily and with it the light that the garden receives. This is good for the veggies, and the broad beans and garlic are very happy.

Cat-Merlyn posing with the broad beans, plus garlic sticking it's leaves up

I thought it was time to dig out the old mini greenhouse and put it together as I'm starting to sow seeds. Sadly, the new cover I got for it was the wrong size. Well, not so much the wrong size as the fact that manufacturers have changed the sizing of recent frames, making them smaller, and meaning I cannot purchase a cover the right size to replace it. Very frustrating! I have considered trying to make one bespoke, but have instead decided to buy a completely new mini greenhouse. When it comes to gardening and having ME, I have to carefully decide where to put my limited energy, and I'd rather put it into growing plants than trying to make a (not very easy to make) bespoke plastic cover.

Hedera colchica 'sulphur heart',
plus snowdrops and pulmonaria planted under the damson tree

I haven't done a lot of planting this month as it rained for much of the month until the last 10 days, though not as bad here as down South. The ground was sodden so not great for planting into. In the last week it's been better and I finally planted my ivy Hedera colchica 'sulphur heart'. This is a lovely variegated evergreen climber, and my hope is that it will not only start covering the fence, but also give more interest and colour to this dimmer corner of the garden. I added some snowdrops under the Damson tree that I picked up at Hodsock Priory, Galanthus Ikariae and Galanthus S. Arnott

The other changes since the end of January are growth! Such as the Solanum crispum 'Glasnevin', also growing up the fence. 

Lots of new growth on the young Solanum

It was with great joy that my Galanthus Bagpuize Virginia suddenly popped up. I wasn't sure they would come up as I dug them up before we left Oxford last March, and they sat in a pot for most of the year, leaves died back, until I finally planted them in the Strawberry Border last November. My lesson from this is that maybe you don't really have to plant snowdrops 'in the green' as is the usual horticultural advice. Or maybe I got lucky?!


Galanthus Bagpuize Virginia in the Strawberry border

Strawberry border with 7 Galanthus Bagpuize Virginia

My first daffodil has flowered, only in the last day, along with Crocus snow bunting.


I pruned back the perennials and Rosa Seagull (growing up the arch) and tidied the herbs in the Herb Border.

Herb Border

And I have this Hellebore, Blue Lady, to plant in the middle of the obelisk.

Helleborus 'Blue Lady'

The hellebores in the Cornus Border are now fully flowering.

Cornus border

As is the first of the gorgeous Iris Reticulata J. S. Dijt.

Beautiful...

The long Shady Border is starting to see sights of further bulb/corm growth, and the Sarcococca confusa is still flowering and fragrant. I need to get onto putting up the proper frame for the Morello Cherry in March, so hopefully by the end of next month the current bamboo cane against the fence will have gone.

Shady border

Overall, the garden has really started to come to life by the end of February. My jobs for March will be focus on some vegetable seed sowing, some in modules and some direct into my new vegetable borders. I'm quite excited that I'll finally be using these borders!


I also need to get the grapevine in, which will be growing up the pergola, and cut back the Cornus shrubs so I can get the lovely red stems to bring joy next winter.

February has been a good month, despite the rain. I'm looking forward to March.


* * * * *
End of month view is hosted by Helen Johnstone, aka @patientgardener. Visit Helen's blog for her February 2014 EMOV and links to other bloggers EMOV posts.

Sunday, 2 February 2014

Crop rotations for the vegetable beds

It's February, it's sunny, at the moment anyway, and I finally feel like the growing season has begun. So I thought it was time to work out what vegetables I plan on growing, and plan the vegetable bed rotations.

Garden design, showing where the vegetable beds are

You can see above where the vegetable beds fit into the overall garden design. And below is a layout of how I'm dividing up the beds for crop rotation. Most beds are 1m square, except for beds 6 and 11 which are 50cms square. The odd size is simply because I couldn't quite fit in 5m long beds, so went for 4.5m long beds. I am squeezing as much out of the space I can, even if it means slight odd bed sizes!

Numbering the vegetable beds for planning rotation

I have planned for a 4-year crop rotation. There are a lot of ways that you can plan your crop rotations. You could do a simple: brassicas, potatoes, legumes and roots, the latter including onions and garlic. You then plant everything together within their respective families, so with potatoes you could place tomatoes and aubergines, and in brassicas you would include cauliflowers, Chinese greens, brussels sprouts and kale.

Crop rotations plan, 2014- 2017

I've gone for something that is more detailed, as I also want to plan for what beds get the most sun. Beds 1 - 8 will get sun for a longer period (an extra 2-3 weeks at least) than beds 9 - 13. So I wanted to ensure that plants that need more sun, such as tomatoes, aubergines, squash and courgettes were to be rotated within the sunnier borders.

As beds 4 - 8 and 9 - 13 and parallel to each other, I'm going to create arches between some beds each year to extend how many climbing beans I can get in. So in 2014 I will be planting legumes in bed 4, with the climbing beans at the right side edge, so I can put in arches (using canes) over to the parallel bed 9 and grow more beans on the left edge of that bed. An added bonus is that this should also look pretty with the temporary arches and bean flowers and pods hanging down.

I also intend on throwing in some poppy, calendula and cornflower seeds into the vegetable beds, randomly, to add more prettiness(!) and to attract pollinators.

In the future, I plan on bringing the west-facing front garden into production. This gets quite a lot of sun all year around, even in winter, so will give me even more beds and yields to play with. I probably won't be starting on that until 2015, as I really want to focus this year on getting the back garden into production, with both vegetables and fruit, as well as flowers.

So the crop rotations are sorted. On with the seed sowing.