Showing posts with label Forest Garden. Show all posts

Thursday, 12 March 2020

Crop rotations: the basics for urban growers

My kitchen garden and forest garden border now. The raised beds currently have garlic,
broad beans and corn salad. Now it's warming up, I can start more seed sowing
and really get the season going.
 
When I published my post on my crop rotation plans for this year in January, I got a lot of interest, particularly from people on Mastodon, who asked me a number of questions. So I thought I'd write a post covering the basics as my contribution to Solarpunk Action Week. The focus is on urban growers, as that's from where my experience comes.

Why rotate your crops?
Or, do you have to rotate your crops, even in a small garden? Yes, yes, you do.

The key principle of crop rotation is that you rotate plants of the same botanical family, which are prone to the same soil-living pests and diseases, and should not be grown in the same spot every year. The aim is to prevent the build-up of soil borne problems, such as club root, white rot, and eelworms, which often have no means of control (1).

If you continue to grow the same few crops in your garden or allotment, you risk a build up of diseases in the soil that might take years to get back under control. Particular diseases include potato cyst eelworms which affects potatoes and tomatoes, and club root which affects brassicas. Of course, in smaller gardens, disease can spread to other soil areas. Best practice is to do what you can to reduce the chance of this happening.

The other key reasons to rotation your crops is for nutrient availability/soil fertility. Vegetables have different nutrient requirements, so moving them around the growing area helps to avoid nutrient depletion in the soil (and remember, you'll be adding compost and manure/green manure each year to also improve soil fertility). Furthermore, rotating crops with alternating deep- and shallow-rooting vegetables, improves soil structure.(2)
A wooden raised bed sitting on top of acid soil.
The raised bed is filled with compost, giving it an alkaline-neutral pH. 

Does soil type (pH) matter?
The pH in soil matters because crop rotations are needed for annual vegetables, which won't grow in acid soil. A pH of 7.0 is considered neutral. An acid soil has a pH value below 7.0 and above 7.0 the soil is alkaline.

When it comes to perennial vegetables, few will have much of a problem with a slightly acid soil (pH 6-7) and some will be ok in pH 5-6. Below pH 5, you can only grow acid loving fruit and vegetables, such as most fruit, including blueberries and strawberries, or acid tolerating perennials such as sorrel.

If you have heavy acid soil (pH 5 and below), as I do, then building raised beds is the way to get around this to grow annual vegetables. My raised beds are 40cms high or more, allowing me enough depth to grow any type of annual vegetable.

Basic crop rotations
Crop rotations are usually practiced on a 3- or 4-year plan. If you have the space, plant your crops on a 4-year plan. For smaller spaces, go for a 3-year plan as a minimum.

For a simple 3-year crop rotation, divide your space into 3 sections or beds, then plant:
  1. Root crops (including potatoes, carrots, beetroot, garlic, onions and parsnips). You could include tomatoes in this group to keep the solanum family (potatoes and tomatoes), together.
  2. Brassicas (including cauliflower, broccoli, kale, radish, kohl rabi and cabbage).
  3. Legumes (peas, broad beans and beans). You could add the cucubits (pumpkin and squash) and vegetables that don't really have a group, such as corn and lettuce, here.
For a simple 4 year rotation, you would use the above, but separate out potatoes and tomatoes into their own group.

The garlic grew in this raised bed last year. This year I have created sections within this, and it
will contain a mix of broad beans, climbing French beans, squash and courgette, parsnip and beetroot.

However, even a basic crop rotation doesn't stay quite this simple, because plants have different seasons in which they grow. You plant garlic and broad beans in autumn and they'll be in their spaces from November to the following July-August. For example, one bed might have the following 4 year rotation:

Year 1: Broad beans Spring and Summer, then winter salads and green manures in Autumn and Winter.
Year 2: Peas, courgette and squash (the peas grow up, the courgette and squash underneath) for Spring, Summer and into mid-Autumn. Then plant garlic from mid-October, which will be  that will be there from October to the following July.
Year 3: Garlic up until mid-Summer, then salads and green manures for Autumn and Winter.
Year 4: Potatoes from Spring until Autumn.

After year 4, you return to year 1 and start again.

This photo shows an overview of a previous garden in mid-summer, 2015, which ran on a 4-year schedule. You can see how much you can fit into a small urban garden. The raised beds have been divided into roughly a metre squared sections, with different annual vegetables growing in each. The same view looked different next year as the crops are rotated.

Below are the plans I have, using a 3-year crop rotation cycle. Visit my post on crop rotations for my garden to see more detail.

Detailed crop rotations
Here's an example of crop rotations for a larger amount of beds, from a previous garden. This also includes a larger amount of crops, including brassicas and solanums. The beds were a mix of 3 smaller beds (1-3), and two long beds (4-8 and 9-13). The long beds were broken up into sections in order to make it easier to plan for crop rotations. This meant I could go with a 4 year rotation plan.

This is another photo from 2015, more clearly showing the different vegetables growing in different sections. In this space is: garlic, potatoes, climbing French beans, broad beans, parsnips, and carrots under white netting.

Final thoughts
You don't even need to start of with making big crop rotation plans as I do (I'm a bit of a nerd in that area). As long as you keep a record of what you plant, and where, each year, you'll be fine. Crop rotations can be flexible, just keep botanical families together. You can mix botanical families, but move them around the beds/rotations, together.

* * * * *
My thanks to Alison from Backyard Larder for information regarding growing perennials in acid soil.

References
1. Growing fruit and vegetables on a bed system the organic way, Pauline Pears, 2004, p25.
2.  Encyclopedia of Organic Gardening, editor Pauline Pears, 2001, p301.

Sunday, 5 January 2020

Forest garden border: reviewing the first season

The L-shaped forest garden border along the south (left) and west (right) facing fences,
in July, prior to the new kitchen garden beds being created in front.

My forest garden border was first planted out in March this year, and I thought it would be useful to review it's first season. It's an awkward border to photograph on whole, so I tend to do it in sections, South (the left side) and West (the right side), which I'll use to refer to when discussing specific plants. A full plant list is at the bottom of this post.
The L-shaped forest garden border along the south (left) and west (right) facing fences,
with the just finished (in August) new kitchen garden beds in front.

I'm pretty pleased with the results from the first season. For a start, the blueberries already started producing, in particularly, Vaccinium corymbosum 'Hortblue Petite' on the South side. This was enough to add to several breakfast muselis.
First blueberry harvest

I had put up temporary netting to protect the fruits from the depredations of birds. However, this isn't an easy way to harvest, at least from an ME perspective, as it uses up more energy than you might expect trying to negotiate the netting and access the berries. So I need to make up a better long term netting set-up. I'm thinking of sewing my own netting cage together, I just need to work out the proportions, based on the size the blueberry bushes will eventually reach (about 1m square). A job for winter/spring.
Temporary netting around one of the young blueberry bushes

The Sorrel bulked up quickly and produced plenty of leaves throughout the season, which I have used in curries and other dishes. And the Rhubarb supplied a couple of kilos of fruit. We added manure around the crown at the end of the season, and will add more in Spring, to feed the hungry roots.

The comfrey has provided it's first harvest and I now have a bucket brewing (right) over winter that will give me comfrey tea, a homemade liquid fertiliser, to feed both edible and ornamental plants plants this coming season. Comfrey is rich in Nitrogen, which supports leafy growth, and Potassium, which promotes strong stem growth, flowering and fruiting of both edible and ornamental plants. I decided I didn't need two comfrey plants, so one has been dug up, and an apple tree has been planted in its place.

The apple trees were finally added at the end of November, after I chose and ordered three varieties at the October Apple Day that I attended. The trees that are all 4-5 years old, and there is a slight chance I might get fruit as early as next season. Fingers crossed.

The apple trees I chose were the following: Newton Wonder - double cordon (west-facing border)

Lord Lambourne (left) and Egremont Russet (right) - both single cordons (south-facing border)

A damson has been added to another part of the kitchen garden area. So not in the forest garden per se, but very close by (like, a couple of metres), so I thought it was worth a mention. I suspect it will be 2 or more years before I get any fruit off this tree. And I have planted some crocuses and daffidols in the border, so I get some early season pretty and the bees will have some food.

Overall, I feel like I've harvested quite a lot for the first season of my forest garden border. I'm not expecting to make any further changes to the planting and layout, so now all the plants can settle in and get growing for this coming and future seasons. And maybe, just maybe, I'll get a couple of apples next autumn?!

 Overview of the south-facing border in December.

Overview of the west-facing border in December

If you are interested in seeing how I planned the forest garden border, see my post creating a mini forest garden border.

* * * * *
Plant List
I've updated the plant list for the whole border, to include the recent additions.

Canopy layer
Apple trees: Malus Newton Wonder, Malus Lord Lambourne, Malus Egremont Russet
Prunus domestica 'Golden Transparent' (greengage)

Just outside of the Forest Garden border are also:
Amelanchier x grandiflora 'Ballerina' and Prunus insititia 'Shropshire Damson'

Shrub layer
Azalea (variety unknown)
Cranberry (variety unknown)
Vaccinium corymbosum 'Bluecrop' (blueberry)
Vaccinium corymbosum 'Hortblue Petite' (blueberry)

Perennial layer - edible
Akebia quinata
Foeniculum vulgare 'Purpureum'
Origanum vulgare 'Aureum' (golden oregano)
Rhubarb (variety unknown)
Rumex acetosa (non-flowering sorrel)
Symphytum x uplandicum 'Bocking 14' (comfrey)

Perennial layer - ornamental
Knautia macedonica
Lychnis coronaria Atrosanguinea Group
Omphalodes cappadocica 'Cherry Ingram' (ornamental)

Ground cover (plants mixed all around the border)
Ajuga reptans 'atropurpurea'
Allium ursinum (wild garlic/ramsons)
Armeria pseudarmeria 'Ballerina Lilac'
Crocus Etruscus Zwanenburg
Crocus Orange Monarch
Crocus Sieberi Spring Beauty
Cyclamen hederifolium
Fragaria x ananassa 'Samba' (strawberry)
Galanthus 'Ophelia'
Narcissus Brackenhurst
Narcissus Minnow
Narcissus Mother Duck
Narcissus Rijnvelds Early Sensation
Phacelia tanacetifolia
Primula vulgaris
Pulmonaria 'Blue Ensign'
Viola odorata 'Queen Charlotte'

Thursday, 14 November 2019

Autumn: Cornus 'Norman Hadden'

My friend Kate, and I, took a stroll/roll* around Sheffield Botanical Gardens the other day. As always, there was something interesting to find in the gardens. This time, it was this 'shrub', Cornus 'Norman Hadden'.

As you can probably tell, it's a rather large shrub. In fact, it can grow to between 4-8 metres! And wow, see that fruit?!

Yes, this is the fruit, AND it's edible. Apparently the skin isn't so nice but the flesh inside is rather good. I didn't try one, because it wasn't until I got home and looked it up that I found it was indeed edible.

As you can see, it's a rather large 'shrub'. It's too big for my Forest Garden Border, but I have my eye on it for another corner of the garden.

But I think I'll have to go back to the gardens and sneakily pick one of the fruits and give it a try first ;)

Either way, what a fine tree, I mean, shrub.


*she strolled, I rolled on my mobility scooter

* * * * *
Other posts in the series:
  Autumn: Acer palmatum 'Sango-kaku'
  Autumn: Prunus mume 'Beni-chidori'
  Autumn: in the Peak District
  Autumn: Salvia 'Amistad'
  Autumn: Fagus sylvatica

Sunday, 6 October 2019

Apple trees for the Forest Garden Border


Back in March I wrote about the design for my Forest Garden Border, and mentioned that I would purchase these in the Autumn. I've previously purchased fruit trees from R.V. Roger Nurseries in North Yorkshire and have always been very happy with their quality, so it was the obvious place to return to for my Apples. They held an apple day this weekend, so we decided to make the trip up there. Not the least because they had quite a number you could taste, and this was the final piece to the puzzle, after much research, to help me choose the right apple trees for my garden.

But before I tell you what I chose, let's take a quick look at the nursery's apple day displays. The below is a photo capturing just a fraction of the apple cultivars they grow and sell at the nursery.

There was a table for the Yorkshire varieties. Many include wonderful names such as Flower of the Town and Sharleston Pippon.

Elsewhere could be found the massive fruit of Peasgood Nonsuch, which would require two hands to hold one apple.

As well as the delightfully small Pitmaston Pineapple, that really does have the fragrance of pineapple.

The displays were wonderful, and the fragrance in the greenhouse was heavenly.

But what did I choose?! In each case, the choices were based on what Kevin and I both liked the most and how we would use them.

Egremont Russet

This a small dessert (eating) apple. The 'russet' part relates to the skin of the apple, which is rough, well, rough in apple terms; a majority of apples have smoother skins. The flavour was fabulous, sweet and juicy, and was our top choice. It had been on my shortlist because it was suitable for the North of England and a wetter climate. The flowers are tolerant of late frosts, and it has some disease resistance. You can pick it from October and it stores until the end of the year.

Lord Lambourne

This is another dessert apple, with larger apples than Egremont Russet. Again, it was sweet and juicy, and this time has the smoother skin, and is suited to the North of England. It stores until the end of the year. It was a very close second with Egremont Russet.

I had been tossing up between choosing just one dessert apple and growing it as an espalier, or choosing two and growing them as cordons. As you can see, I went for growing two as cordons. Like all edibles, apples and their cultivars can have some better years than others, and by growing more varieties, I increase the chances of at least one of them preforming well in any given year.

Newton Wonder

This is a dual purpose apple, meaning it has both dessert and culinary (cooking) qualities. It starts out as a cooking apple, then over time mellows to a lovely eating apple (we've tried it before). And because of it's long use period (you can store it between November and the following May), we can use it as a culinary apple first, then an eating apple in the new year. It's also another apple hardy for the North, with it's blossoms being tolerant of late frosts.

In this case, I've chosen to grow this as a double cordon. To the right you can see a photo of a 'Double U Cordon', with two sides each in a U shape. I'll be growing the Newton Wonder just as a double cordon, in effect, just one of the U's in the picture.


I'll be receiving my choices that have already been trained into cordon and double cordon shapes. They will be sent out  as bare root trees; trees that are dug up by the nursery in late Autumn when they are dormant. They'll be posted (well, couriered) to me as is, so they won't be in pots. I'll need to either plant them straight away, or if I cannot do this, I could just 'heel them in'. This is a process where you either just lightly plant them in a pot or bare soil, and then water them. You don't go to great efforts, you are just ensuring the roots don't dry out before you finally plant them. I'll aim to get them properly planted in December.

Thanks to the R.V. Roger staff member (I sadly didn't get their name) who answered all my questions. It was lovely chatting to them and it really helped me make my final decision.

So, I have my apple trees on order, and I'll finally be able to complete the planting for my Forest Garden Border.
The author at Apple day

* * * * *
See also:
Tips to help you choose the right apple tree(s)
Creating a mini forest garden border

Monday, 30 September 2019

Tips to help you choose the right apple tree(s)

Malus domestica 'Charles Ross'

In the last couple of weeks I've been carefully researching what apple trees that I want to plant in my Forest Garden Border. One thing I found was that it was hard to find all the key information that informs your choice, in one place, whether online or in books. Since this is all in my head at the moment, I thought I'd jot down the key tips I felt would be useful for anyone wanting to grow apple trees.

Disclaimer: as I'm based in the UK, this is where my learning and knowledge is based, and this will be reflected below. I am an amateur, so this shouldn't be viewed as expert advice. This is just a collation of the information I found, which I thought others might find useful.

* * * * *
Taste 
This is of course number one. If you don't like the fruit, you won't eat it. So choosing for taste is paramount. In the UK at least, fruit tree nurseries and community groups often hold Apple Days in October, and usually have a range of cultivars available for you to taste.

Rootstock
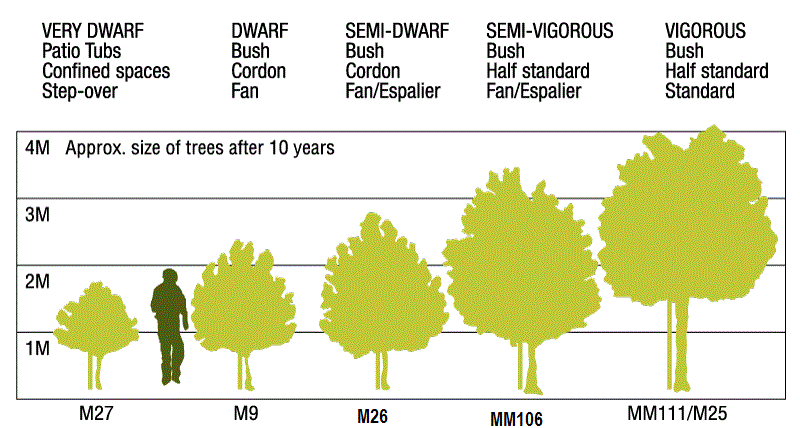
After taste, this is the next most important item. The rootstock controls how small or large, and how vigorous, your tree will be. Think about how many apple trees there are that have got out of control and fruit is left rotting on the ground because people can no longer manage them. In many cases, this is because people didn't consider the rootstock seriously, for both their current and future selves. Choose a fruit tree rootstock that you will be able to realistically maintain now and in the future. Types of rootstock with ultimate height if trained as a bush:

M27: very dwarfing, 1.2-1.8m (4-6ft) x 1.5m (5ft)
M9: dwarfing, 1.8-2.4m (6-8ft) x 2.7m (9ft)
M26: semi-dwarfing, 2.4-3m (8-10ft) x 3.6m (12ft)
MM106: semi-vigorous, 3-4m (10-13ft) x 4m (13ft)
MM111: semi-vigorous, 4-4.5 (13-15ft) x 4.5 (15ft)
M25: vigorous +4.5 (15ft) x 6m (20ft)

The RHS website goes into more detail about the growing habits of each of these rootstocks.

Useful graphic to show the approximate ultimate sizes of each rootstock. Source: Blackmoor

Climate
Apples grow best in temperate climates like the UK and northern Europe. Certainly, they aren't desert or rain forest plants. But within a temperate climate, some trees will grow better in certain conditions. So if you live in a particularly wet climate (hello west Wales), choosing trees that don't mind the wet makes sense. Also, some trees need more sun than others, like a nice south-facing wall (or north-facing if you're in the southern hemisphere), and what grows well in the south of England, for instance, won't necessarily in the north. Learn about your regional and local micro-climate conditions.

Cultivar
There are something line 750 different apple tree cultivars in the UK. Some will be incredibly niche, but there are probably a good 200 that are readily available from online fruit tree nurseries. There really will be one out there for every taste.

Pollination/flowering group
This refers to when the blossom will be out for insects to pollinate. Many apple trees are diploid, which means they need a least one other tree nearby in order to be pollinated. Of these, many will be  "self-sterile". This means their pollen won’t fertilize their own flowers and they therefore need another compatible cultivar for cross-pollination in order to produce fruit. And even the so-called "self-fertile" cultivars will fruit better with a partner tree.

Some apple trees are triploids, and they are different again. I'll quote here directly from the RHS:
... a few apple and pear cultivars (known as triploids) such as ‘Bramley’s Seedling’, ‘Holstein’, ‘Ribston Pippin’, ‘Blenheim Orange’ and ‘Catillac’ produce mainly sterile pollen. These won’t be any use for cross-pollinating other trees, and for their own fruit to set, still need other trees. Therefore if you grow a triploid cultivar you will also need two other trees that will pollinate each other as well as the triploid, and these three cultivars must all flower at the same time. (Source, RHS)
As far as I've seen in the UK, the pollination groups are either A - D, or flowering groups 1 - 7. A (1) will blossom first, then B (2), C (3) etc. They are essentially the same thing, just different naming/category conventions. The nursery's catalogue will tell you what pollination or flowering category a tree will have.

The key thing to know is that you should get two (or three for triploids) trees in either the same pollination/flowering group, or the adjacent pollination group. So:
  • Two A's or 1's of different cultivars/varieties will pollinate each other.
  • An A/1 and B/2 will pollinate each other, but and A/1 and C/3 will not.
  • A tree that is in the C/3 pollination group can be pollinated by other C/3 cultivars, but also B/2 and D/4 cultivars, etc.
  • However, you cannot only have two of the same cultivar in any pollination/flowering group, as these won't pollinate each other (these are self-sterile).
Trees should be planted within 18m (55ft) of each other to effectively cross pollinate.

Spur or tip bearing
Tip bearing: produce fruit at the tip of each shoot.
Spur bearing: produce fruit along side shoots (spurs)
Partial tip bearing: produce some spurs as well as fruit buds at some shoot tips.

Source: RHS Fruit and Vegetable Gardening, 2002, p. 175.

A majority of apples tend to be spur bearing, a few are both, but do check if it isn't stated clearly, as this will change the type of pruning you need to do to the tree. For example, if you go and prune all the tips of a tip bearing tree in winter, you will have just pruned off next seasons harvest.

Period of use
This is for how long are the apples, once ready for harvesting, able to store. Online nurseries often include this information. Some apples need to be eaten within a short space of time, whereas others may store for several months.

Fruit type
Culinary - cooking
Dessert - eating
Dual - both cooking and eating

Tree form or type
You will find a large number of tree types out there, but the most familiar ones will be: standard (your basic shaped apple tree), espalier, cordon, step-over, fan, and ballerina.

The most most common tree rootstock available will be a Maiden, which is an untrained one year old tree, probably about 1m high. You then train this into any of those above, dependent on it's rootstock, of course. This is the cheapest way to buy a tree, c. £15, but it will take longer before you will get your first harvest. If you can afford it, and don't want to wait, you could by a tree type listed above, already trained. A 1 or 2-tier espalier will probably be around £45, and you'll get your first harvest within a couple of years.

Right: a wonderful example of an espalier, at Anglesea Abbey. This is a pear; apples and pears have the same pruning regime.

Other thoughts
  • Grow something different to what is available in the supermarket. After all, you can already easily get those cultivars. Plus, it helps the species if a diverse range of apple trees grown.
  • Catalogues (print and online) should give you enough information about each cultivar available, often including the origin and history of a cultivar.
  • Pruning is done in winter for most apples.
  • If you only have a very small garden or balcony but would like a couple of different cultivars, there are some trees available, called 'family trees', that have grafted onto them two or three different cultivars of apple. In this case, one tree would cover your pollination/flowering needs too.
  • Pot grown apple trees (those that you purchased planted in pots) can be planted year round, though I'd avoid late spring and summer unless you want lots of work watering them daily.
  • Bare root trees (those you purchase which have no soil around them) are only available in Autumn and Winter and must be planted by the beginning of Spring. Planting during winter helps them establish their roots before the warmer weather starts. You will find a much, much, larger number of cultivars available as bare root trees.

Useful books and websites
The information here has aimed to just cover the key details that will help you choose an apple tree. For further reading, I refer to the following two books that I use the most:

RHS Fruit and Vegetable Gardening: this covers information on each the most common fruit and vegetables available, including good chapters on apples and other fruiting trees and bushes.

RHS Pruning and Training: this is my bible for learning how to prune your tree correctly. It has incredibly useful diagrams for many common ornamental and edible plants. Just it's chapter on Apple trees alone, is worth the cost. Though it's probably in your local library for free.

I find the best websites with the most useful information, are fruit tree nurseries. I have personally used and recommend: R.V. Roger, Walcot, Keepers, Orange Pippin and Blackmoor.

Recommended by others: Adam's Apples (by VP)

* * * * *
My hope is that this information will be useful to others. I've had to balance giving you enough key information, with not overwhelming you with too much information. If you think I've missed out a really key point, do leave a note in the comments.

Happy eating!

Wednesday, 17 July 2019

New veg beds - aka finally making a decision on the final layout of my kitchen garden

The kitchen garden?

Not an inspiring photograph, is it? I mean, yes, you can see my slowly developing Forest Garden Border around the edges (the blueberries are nearly ready!), and some raised beds with garlic. But the lawn dominates. However, not for much longer.

I've always intended that this area of the garden would become my kitchen garden, as it gets the most sun all year around. I just hadn't been able to make a decision about the design layout. I've played around with a number of layouts over the last few months, and I've finally came to one that I both liked, and that I felt maximised the use of the space. And here's the plan:

Base map: showing the shape of the design clearly

I view it as a geometrically-shaped flower.

The design has been very carefully measured a few times, and I'm certain that it will work. And I must thank Andrea, my gardener, who helped me with the final measuring out and design tweeks.

 Final design with all the careful measurements

Once again, I'm going with straight lines. That's because straight lines are so much cheaper to build. I plan on adding some plants, such as creeping Thyme, along the paths, as well as some other low growing herbs and ornamental plants, which over time will help break up the lines.

The beds will be made sleepers again and will also be two levels high. As I've mentioned before, I have acid soil, so I need to build the soil level up with alkaline/neutral compost if I want to grow vegetables. For the paths, we will be putting down a permeable membrane, and will then add purple shale on top. I've used this method in the past and I know it works well and looks good. 

The obelisk sitting in the middle of another raised bed during last winter.

I'll be moving my Obelisk from it's temporary position (above) to the centre kitchen garden bed, which will add some height and year round interest. And of course, it will be good for growing climbing french beans and peas, with cut flowers, including sweet peas, on alternate years.

The landscapers will be here next week! And I've just ordered the nearly 5 tonnes of compost to fill the beds. So it's all go for my new kitchen garden borders.

Sunday, 28 April 2019

Daily Perennials: 22nd to 28th April 2019

Daily perennials this week.

Monday 22nd April - Fragaria x ananassa 'Samba'
It might not look like it, but this is a strawberry flower!
This has smaller fruit than the typical strawberry, however, it also flowers and fruits for a much longer period, from April until about November. I'm growing this as one of the ground cover plants in my mini Forest Garden Border. Beautiful and edible - what a combination!


Tuesday 23rd April - Tulipa 'Abu Hassan'
If you want to liven up a Spring border, T. Abu Hassan will do it.

The colour palate of my front garden is to primarily use bright reds, yellows and oranges, with blues and purples, along with green foliage, as backing support. This is the most fabulous, totally over the top, flamboyant tulip, and I adore it.

Wednesday 24th April - Myosotis sylvatica
The ever pretty common forget-me-not.

Ok, some of you might say, isn't that a biennial? Well, yes, but it can also be a short-lived perennial. And despite it's diminutive size, it's well loved by bumblebees as well as butterflies. There is nothing common about M. sylvatica if you ask me.


Thursday 25th April - Narcissus Falconet
A later flowering narcissi, coming into bloom around early to mid-April.
This is another fragrant narcissi and brightens the border after many other daffidols have faded. I have this along the path to the front door, so others can enjoy the colour and fragrance too.

Friday 26th April - Anemonella thalictroides
A delightfully dainty little flower.
Other names include 'Rue Anemone' and 'Mayflower'. It might look rather delicate, but this little plant will survive the hardest of winters. They count as alpines, so instead of growing them in a border, I grow this and other species in pots, which I then move around the garden to show off when they flower.

Saturday 27th April - Primula vulgaris
The common Primrose.
You can find this everywhere in Spring, even along the banks of motorway, yet I never get bored of it. I've planted about 50 around the front and back gardens, and look forward to drifts of Primulas in future years.

Sunday 28th April - Anemone blanda
Sweet little Anemone, also known as windflower.
There are a lot of great Spring 'blues' in the plant world, and this has to be one of my favourites. I've planted a bunch under my Quince tree and as it spreads, it will turn into a sea of blue that I can view as I look out my lounge window.


And wow, I've managed to do my first full week of Daily Perennials :)  However, I'm going to stop doing them for now. I've realised that with the ME still being so bad, and the fact I have other blog posts I want to write, that I don't have the energy for both at this time. It was fun though!

About Daily Perennials
#DailyPerennial #Florespondence

Friday, 1 March 2019

Creating a mini forest garden border

For some years I've been enamoured of the idea to create a forest garden, an edible and fairly low maintenance way to grow food. It's only with this garden that I realised that I had the right conditions to finally create my own mini forest garden border.

Martin Crawford's book (right) is the seminal text for learning about forest gardening, and it was a rare occasion where I read a gardening book from cover to cover. It just has so much information that was written in a straight forward tone, following each step of the process, and offering a large range of suggestions of what plants can be grown in each layer that will suit a range of climates.

My intention here is to show you how you can use the principles of creating a forest garden on a small urban garden scale. I aim to create a space that offers food for myself and for pollinators, that works within my health limitations (I have the chronic illness, ME), and that adds beauty to my small garden, whilst also being low maintenance.

The space that will become my Forest Garden Border

First up, I measured out the space and plotted this onto a base map, including the direction of North. I had previously done a soil test so I knew that my soil is acid clay. Apart from digging the holes for plants, I use the no-dig method. I plan on adding compost and mulch each time a key plant is planted, and will continue to add some each autumn to the whole border and I'll let the worms do the work to loosen up the soil, and release the nutrients that are locked up in clay soil.

I had spent a few months surveying the space and the way light and shadow moved across it and added a sun map on top of the base map. The border has one south-facing side and one west facing side and the arrows show how the sun moves across the garden during the day, moving from the top arrow, down. Plotting this and the base may measurements out was important for helping me decide how many trees, and what type, I could include in my design.

For example, the Amelanchier, which is shown on the Sun Map, is in a raised border off to the right. Though it will cast a small amount of shade a certain times of day when in leaf, because of it's height, and the height of the sun from April to September, this will be quite minimal and won't impact on the amount of light plants like the rhubarb and apple trees will get. And in winter it's deciduous so the forest garden border will benefit from all light available during this period. The greengage is in the South-West corner, and won't be casting an shade at all on the plants below as the sun is always moving in front of it. I do need to ensure I keep it pruned so that it doesn't get to big and block a neighbour's garden though.

Now we come to the layout map. Here I have plotted out all the key plants, A - N, and worked out their ultimate size and placed each onto the map. The ground cover plants will be slotted in here and there as space allows.
See the full list of plants below

Drawing circles is not my strong point(!). But I've been able to map out the maximum size of each plant so I'm clear what can fit in. It will still look a little bare for the first couple of years whilst the plants start filling out, so I'll have to be strong and not add any more, only to have to remove them later because the other plants have grown to their full width and height.

A forest garden has 3 layers, though I've broken them down below into 4 (separating out the Perennial and Ground Cover layers), as I found this more helpful for my planning.

Tree canopy layer: This includes small as well as large trees. These are A, H and N on my plan, a greengage and two apple trees.There is also the Amlanchier tree off to the right of the actual border, that I consider a part of my forest garden. Whilst it looks like they will be crowding the plants next to them, they won't because they will all have trunks with the first branches growing above the plants below in the Shrub and Perennial layers.

Shrub layer: Because my soil is acid clay, it made sense to add in fruit that grows well in acid soil. So cranberry and blueberries have been chosen. One of the blueberry varieties, Hortblue Petite, crops at least twice a year, and it is a nectar source for bees and other beneficial insects.

Perennial layer: This is going to be a mix of edible plants, such as the sorrel and rhubarb, and plants for pollinators, such as the comfrey. The comfrey is the 'Bocking 14' variety, which doesn't self seed. Comfrey, with it's deep roots, is an excellent nutrient and mineral accumulating plant, particularly of potassium. If you plant comfrey near fruiting trees and shrubs, they benefit from the minerals the comfrey has accumulated. This is why the two comfrey plants are on either side of the greengage tree and not far from the cranberry and blueberries. Comfrey leaves can also be used as a mulch, and of course, to make comfrey liquid feed.

Ground level layer: This is also a mix of edibles, such as the sweet violets, strawberries and ramsons, and plants for pollinators. Eventually there should be no bare soil showing, which should limit annual weeds from germinating.

Two Blueberries and some violas waiting to be planted out into the Forest Garden Border

I want the border to be low maintenance, in particular because I have so little energy to undertake tasks in the garden. The main maintenance tasks will be pruning the fruit trees, summer for the greengage, winter for the apple trees, and cutting back dead foliage of the perennials in early spring. At this stage the soil is mostly bare, so there may be some weeding required, but hopefully the ground cover plants will do their job and make weeding minimal in the future.

I took time in planning the border. This is in part because of my health, but mainly because good permaculture practice is to take time to observe the space, ideally over a year. This helps you spot issues that might not show to start with. Although my garden is relatively flat, careful observation showed me that this part of the garden is the highest, but another area is lower and I discovered it could be prone to some flooding, mainly water sitting on top of the soil/grass. Water flows from the Forest Garden Border area down, so hopefully as mulching over time loosens the soil, it will also drain better so it doesn't all flow down to the lower part of the garden.

It was also important to really think through what I wanted to grow and why. Each plant I've chosen suits my taste, skill, and health limitations, and is also suitable for the space where I'm creating the Forest Garden Border. I'll continue to observe how the border grows, and adapt, if needed, over time. For now, I'm excited to put the plan into action; I'll finally have my own (mini) Forest Garden Border!

Andrea, my gardener, will be helping get the blueberries and other plants into the ground next week, and I'll choose two apple trees in the autumn. I'll post follow-up in the summer, so you can see how it's coming along.

I inherited the rhubarb with the garden, and it's now ready for my first harvest of the year.

* * * * *

PLANT LIST
Canopy layer
A: Greengage, Prunus domestica 'Golden Transparent'
H & N: Apple trees, to be chosen. They will be on a dwarfing or semi-dwarfing rootstock.
K: Akebia quinata, also known as the chocolate vine. Although the fruit is edible, I'm predominately growing it for the flowers and to allow it to grow all over the wall as it's an evergreen. I'm hoping that, along with the ivy that's already growing on the wall from a neighbours garden, that it will offer a further habitat for small insects and pollinators. 

Also, just off to the right of the top border is an Amelanchier x grandiflora 'Ballerina', also known as  Juneberry or Apple serviceberry tree. This has the most edible of all Amelanchier fruits and I consider it part of the forest garden, though it sits outside the border.

Shrub layer
E: Cranberry (variety unknown)
F: Azalea (variety unknown). It's here because had it, and it's happy in acid soil. The flowers are good for pollinators.
I: Blueberry, Vaccinium corymbosum 'Hortblue Petite'
J: Blueberry, Vaccinium corymbosum 'Bluecrop'

Perennial layer
B: Rhubarb (variety unknown)
C & D: Sorrel, Rumex acetosa (non-flowering variety)
G: Golden oregano, Origanum vulgare 'Aureum'
L & M: Comfrey 'Bocking 14'

Ground cover (plants mixed all around the border)
*Strawberry, Fragaria x ananassa 'Samba'. This is a smaller sized strawberry, but is made up for in the fact that it fruits from May until November.
*Sweet violets, Viola odorata 'Queen Charlotte'. Edible flowers and good for pollinators.
*Ramsons, Allium ursinum. Also known as wild garlic. Edible stalks and leaves and good for pollinators.
*Ajuga reptans 'atropurpurea'. A good evergreen ground cover plant. Helps cover bare soil so there are less weeds.
*Primula vulgaris. Good for pollinators and will self seed and help cover bare soil.
*Phacelia tanacetifolia. This is an annual that will self seed. It is known as a green manure and is excellent for pollinators.

I will also add a mix of early flowering spring bulbs this autumn to help early pollinators such as solitary bees, and to add further interest and beauty.

Martin Crawford's book, Creating a Forest Garden, was pivotal in helping me understand what should go where and why. I highly recommend it, and because it's been around for some years, it can be found in libraries too.